Electricity
What is electricity?
Electricity is the flow of electrons.
You might ask, what are electrons and where do they come from? To answer this, let's take a look at an atom. The atom is the smallest unit of an element.
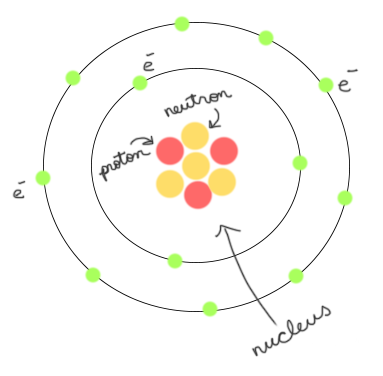
Atoms are made up of protons, neutrons, and electrons. The protons and neutrons are found in the nucleus of the atom. The electrons are in energy levels that are like orbits around the nucleus. The further an electron is from the nucleus, the easier it is to knock that electron off of the atom.

To make electricity, you can drag your feet across the living room carpet or get up from the couch. Electrons are knocked off the carpet or the couch and stay on you. When you touch someone or touch a metal object, the electrons jump off you and this gives you a shock. This is an example of static electricity.
Static electricity is not the same electricity that flows through the wires in our homes. To make the electricity that is used in the wiring of our homes we need a generator. To understand how a generator works, you can try this little activity:
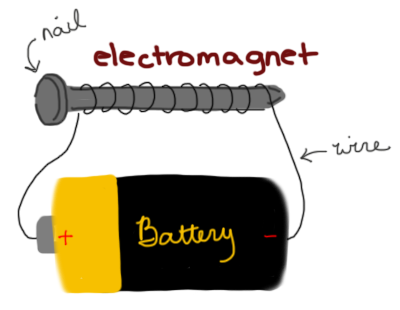
Wrap some bell wire (you can buy it at Radio Shack, or your local hardware store) around a nail. Remove about one inch of insulation from the ends of the wire. Connect the bare ends of the wire to a flashlight battery using some tape. Now try picking up some paperclips with the nail. The nail has become magnetized. You have made an electromagnet.
Take a cardboard tube, like the kind that you get from a roll of paper towels, cut the tube so that its about four inches long. Take some bell wire and wrap it around the tube. Try to get at least 10 – 12 coils.
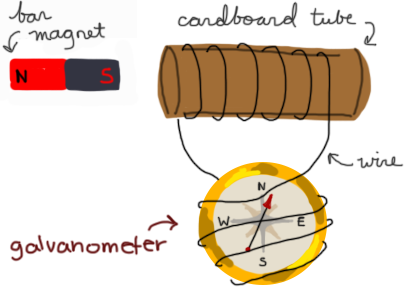
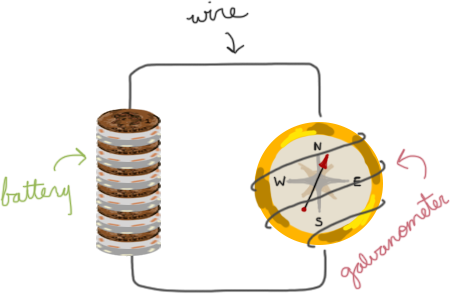
Take a magnetic compass and wrap some bell wire around it. At least 6 – 8 coils. If electricity passes through the coil of wire, it will produce a magnetic field (like it did with the nail). This cause the needle of the compass to move. The device that you made is called a galvanometer. The galvanometer will detect an electric current.
Next take the ends of wires coming from the coils around the cardboard tube and connect them to the wires from the galvanometer. After making the connection, your device should look like the above drawing.
Take a bar magnet and insert it into the cardboard tube in a back and forth motion. As you do this watch the compass needle; the needle should be moving back and forth. The needle of the compass is a magnet. As you move the bar magnet, electrons start to move in the wire. An electric current is produced. The electric current going through the coil on the compass produces a magnetic field as it did with the nail. This causes the compass needle to move.
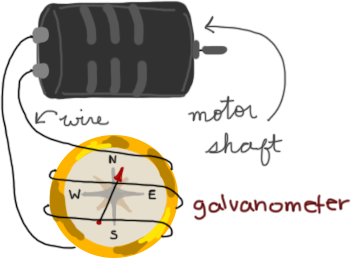
This is a simple method to make an electric current. But this is not exactly the way the electric company does it. If you take a small toy hobby motor and connect it to a battery, the motor will run. But if you take the same hobby motor, connect it to a galvanometer and turn the shaft of the motor with your hand, the needle of the compass moves -- the motor now makes an electric current. The motor is now a generator. Hybrid cars use this technique to store energy when the car is braking.
At the power plant, electricity is made with a large generator that has a set of fan blades (called the turbine) attached to the shaft. The turbine is made to turn by having steam blow against it. A wind generator has wind blow against a propeller. At a hydroelectric plant, water flows against the turbine blades.
Conductors and Insulators
Once the electricity is produced, it must travel to your house. We use wires to do this. These wires are conductors. A conductor is something that lets electricity pass through it. Good conductors are metals. The best metal conductor is gold but it's too expensive to use in house wiring (but is used in high end electronics, like computer processors). Copper and aluminum are good conductors and cheap enough to use in normal wiring of houses.
Insulators will not let electricity pass through it. Examples of Good insulators include: glass, rubber, wood, and plastic to mention a few. We usually cover the conductor with an insulator so when we pick up the conductor we don't get shocked.
You can try a little experiment to see what objects are conductors and what objects are insulators.
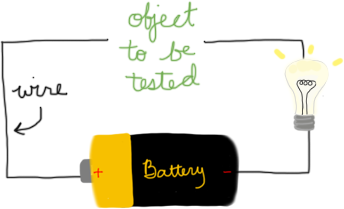
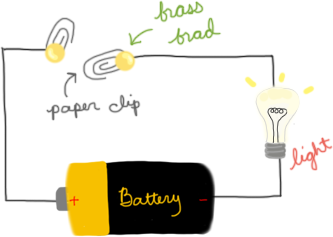
Take a series of household objects such as a paperclip, paper, penny, dime, styrofoam cup, tennis ball, knife, coffee cup, shoe lace, etc.; place the object between the two wires and have the wires touch the object. If the light bulb lights up, the object is a conductor. If it doesn't light up, it is an insulator.
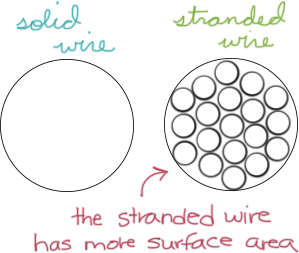
The electricity travels on the surface of the metal wire. The electrons do not travel through the center of the wire. As the electricity travels over the wire, there is friction (resistance) between the electrons and the wire. Each type of wire has a different amount of resistance. This is why some wires are better then others.
If you have a wire that must travel a long distance, the amount of electricity entering the wire is not the same amount that reaches the other end. Some of the electricity is lost due to resistance. Just like the friction from rubbing your hands together quickly, the lost energy is lost as produced heat.
To get more electricity reaching the end of our long wire, we could use a larger diameter wire. The larger wire will carry more electricity. But this is not practical. The wire would be too heavy and costly. By using a larger diameter wire, we increased the surface area of the wire. By using a bundle of several smaller strands of wire, we increase the surface area of the wire. It's kind of like doing away with the middle of the large wire.
Circuits
Series circuits
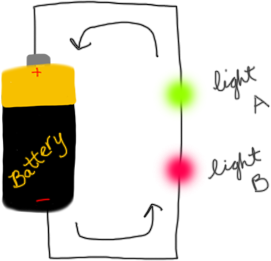
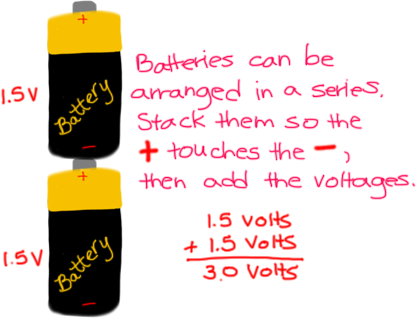
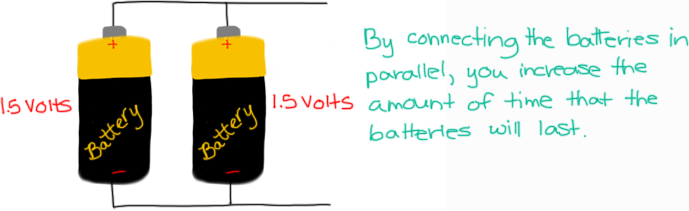
In the series circuit, the electric current goes through the first light then goes through the second light before returning to the battery. The problem with this is that if one light goes out it breaks the circuit and the other light also goes out. Older Christmas tree lights used to have this problem. Devices that take multiple batteries (like a flashlight) use a series circuit to connect the batteries together.
Parallel Circuit
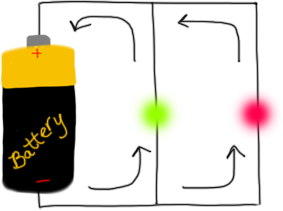
In a parallel circuit, the electricity splits up with some of it going to each of the lights. Now if one light goes out, the other remains on. This is the type of circuit that we use in wiring our homes.
Wire
Copper wire is getting expensive to use in some lab activities. Using masking tape and aluminum foil, you can save some money by making your own.
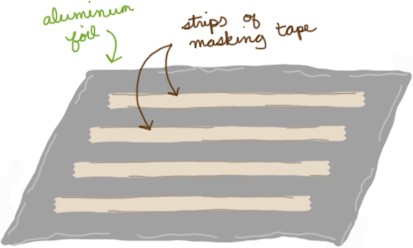
Cut along the edge of the masking tape. The masking tape is the insulator and the foil is the conductor. After cutting the strips of wire, fold each strip long ways with the aluminum foil on the inside. If you want to connect two strips of wire, foil over the edge of one strip so the aluminum is facing the top of the wire. This end can be slipped into the other wire. Use tape to hold in place. Remember when connecting two wires: metal to metal.
Switches
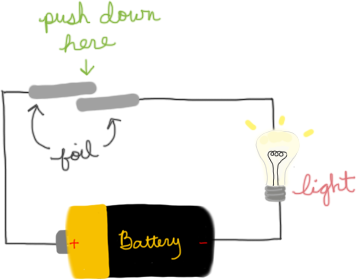
Wire A House
A nice activity to put a lot of this information to use is to wire a shoe box house.
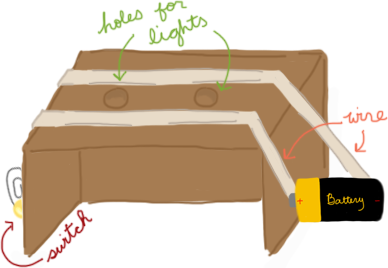
Have students bring in a shoe box or small box of similar size. Run two wire strips across the top of the box; use a pencil and punch two holes in the top of the box – this is where the lights will go. Connect one of the light wires to the wire strips on the top of the box. Connect the other light wire to a switch that you mounted to the side if the box. Once the light are connected, connect the battery to the wires on top of the box.
(I like to use lights that you can buy at Hobby Lobby that are battery operated. They come in a string of 10 lights. Just cut them apart before using. Sometimes I can find similar lights at the Dollar Tree store)
Make A Motor
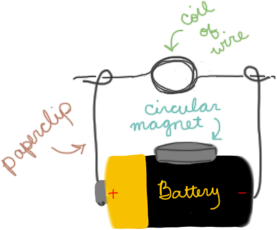
Materials needed: C or D cell battery, circular magnet, 2 small paperclips, 32 inches of magnet wire, small piece of sandpaper, and some masking tape.
Procedure
Take the magnet wire and wrap it around the battery. Slide it off the battery; leave a straight extension on either end that acts as an axle.
- Sand the insulation off the part of the wire used as the axle
- Unbend the paperclips so they have a straight side and an eyelet at the top
- Tape the paperclips to the ends of the battery with the eyelet at the top
- Attach the magnet to the battery as seen in the drawing
- Slip the axles through the eyelets
- Give the coil a small spin -- it should begin to spin on its own
Common problems: the insulation not thoroughly removed, paperclips not making good contact with the battery, the distance between the coil and the magnet needs to be adjusted
AC / DC
AC means Alternating Current. When we did the demonstration by moving the bar magnet in and out of the coil of wire, the compass needle moved back and forth. This back and forth motion is alternating current. The motion changes 60 times in one second for the electricity made in the United States. We say that it has 60 Hertz (cycles per second). Electricity in different countries may use a different Hertz.
DC means Direct Current. This is the type of electric current that we get from a battery. The electric flows from the negative to the positive poles. This was the first type of electric that was used in houses. Today, we don't use DC in our houses today because it cannot be transmitted efficiently over long distances -- and Alternating Current can be.
Make a Battery
-
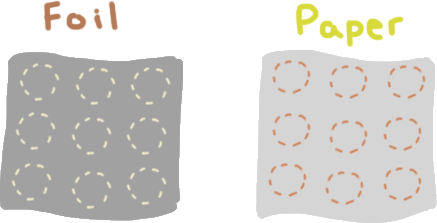
Make some circles out of aluminum foil and paper.
-
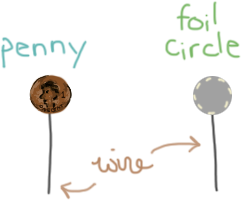
Tape a wire to a penny. Tape a second wire to a foil circle.
-
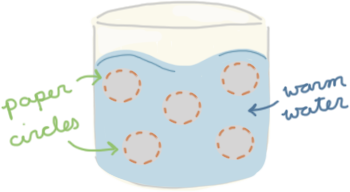
Dip the paper circles in warm salt water.
-
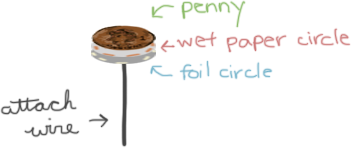
Place the foil circle with the wire attached on the table. Place a wet
paper circle on top of the foil circle. Place a penny on top of the wet
paper circle.
 Build up more layers of foil, wet paper, and pennies. The penny with the
wire attached goes on the top. You can wrap the battery with making tape to
hold it together.
Build up more layers of foil, wet paper, and pennies. The penny with the
wire attached goes on the top. You can wrap the battery with making tape to
hold it together.
-
Attach one wire to the galvanometer or to base of the plug of earphones.
Scrape one wire on the tip of the plug. You should hear crackles in the ear phones.
This is due to the electricity that the battery is creating.
Fruit Battery
You can make batteries out of a variety of fruit but citrus fruits work the best (because of the amount of acid in this fruit).
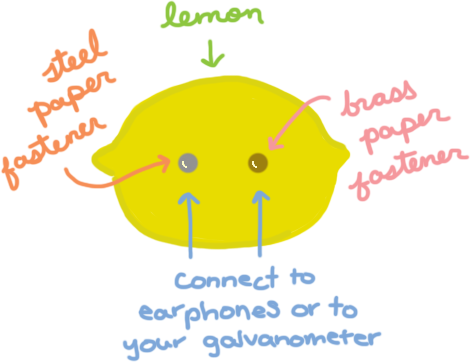
You must use two different kinds of metals. Try various metals to see which combination works the best. The metals can be nails, strips of metal, wire, or paper fasteners, for example. Make sure that the ends of the metal does not have any insulation on it.
Thermocouple
Electricity can be made by twisting two strands of different types of wire together and then heating the twisted area. The amount of electricity generated depends on the properties of the two metals being combined.
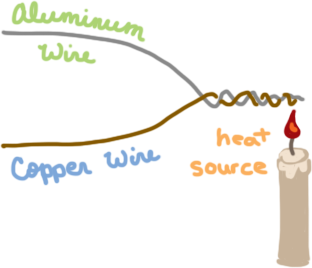
You can hook the ends of the wire to a set of ear phones like you did for the penny battery or to your galvanometer. Thermocouples are often used to measure temperatures at extreme conditions (hundreds or thousands of degress above the boiling point of water) when traditional thermometers fail; the amount of electricity created is proportional to the temperature.